
In this blog post I’ll explain how to use the VxWorks 7 kernel shell to read and write registers in hardware devices. This is a very helpful feature for anyone developing device drivers or other code which interacts directly with memory-mapped devices.
VxWorks 6.9 kernel shell
If you’ve worked with VxWorks 6.9 you’re probably used to being able to use the kernel shell to access memory-mapped registers in your target hardware. For example, you can dump a set of registers mapped into memory at a known base address using the d command (really, a function):
-> d 0xffd02000, 8, 4
NOTE: memory values are displayed in hexadecimal.
0xffd02000: 00000001 000000ee 3fe449ea 00000000 *.........I.?....*
0xffd02010: 00000000 00000000 3130362a 00000000 *........*601....*
value = 0 = 0x0
->
(which dumps 8 registers each of width 4 bytes starting at 0xffd02000)
or modify registers using the m command:
-> m ffd02000, 4
0xffd02000: 00000001-
0xffd02004: 000000ee-ff
0xffd02008: 3e63054e-.
value = 0 = 0x0
->
(again, the 4 specifies the register width in bytes)
You can also modify a register using pointer syntax like this:
-> *0xffd02000 = 0
value = 0 = 0x0
->
Incidentally, the hardware I’m accessing in these examples is an L4 Watchdog Timer in the Intel (Altera) Cyclone V Hard Processor System (HPS).
VxWorks 7 kernel shell
If you try the same thing using the VxWorks 7 kernel shell, you might be surprised to see something like this:
-> d 0xffd02000, 32, 4
NOTE: memory values are displayed in hexadecimal.
0xffd02000:
Data abort

Exception address: 0x003736a8
Current Processor Status Register: 0x60000013
Data Fault Address Register: 0xffd02000
Data Fault Status Register : 0x00000005
0x00358ea0 shellInterpCparse+0x1328: 0x0035f364 ()
0x0035f450 shellInterpClex+0x6074: shellInternalFunctionCall ()
0x00355854 shellInternalFunctionCall+0x88 : memoryDump ()

Shell task 'tShell0' restarted...

->
What went wrong there? In short, the attempt to read the device registers failed, causing an exception, because VxWorks 7 manages address mapping in a very different way to VxWorks 6.9.
Memory management
To understand what happened, we have to talk about memory management. VxWorks is normally configured to use the memory management unit integrated into modern processors (other than micro-controllers) to control how programs access memory and other memory-mapped hardware. This means there are two kinds of address:
- virtual address: used by software to initiate a memory access – essentially equivalent to a pointer in C
- physical address: used by hardware to direct “memory” accesses to the right hardware (memory, i/o device, etc.) – this is what you’ll see in the Address Map section of hardware documentation
Without going into the gory details, when VxWorks is running it sets up and maintains a mapping from virtual addresses to physical addresses. This diagram from Wikipedia gives a general picture of how address mapping works:
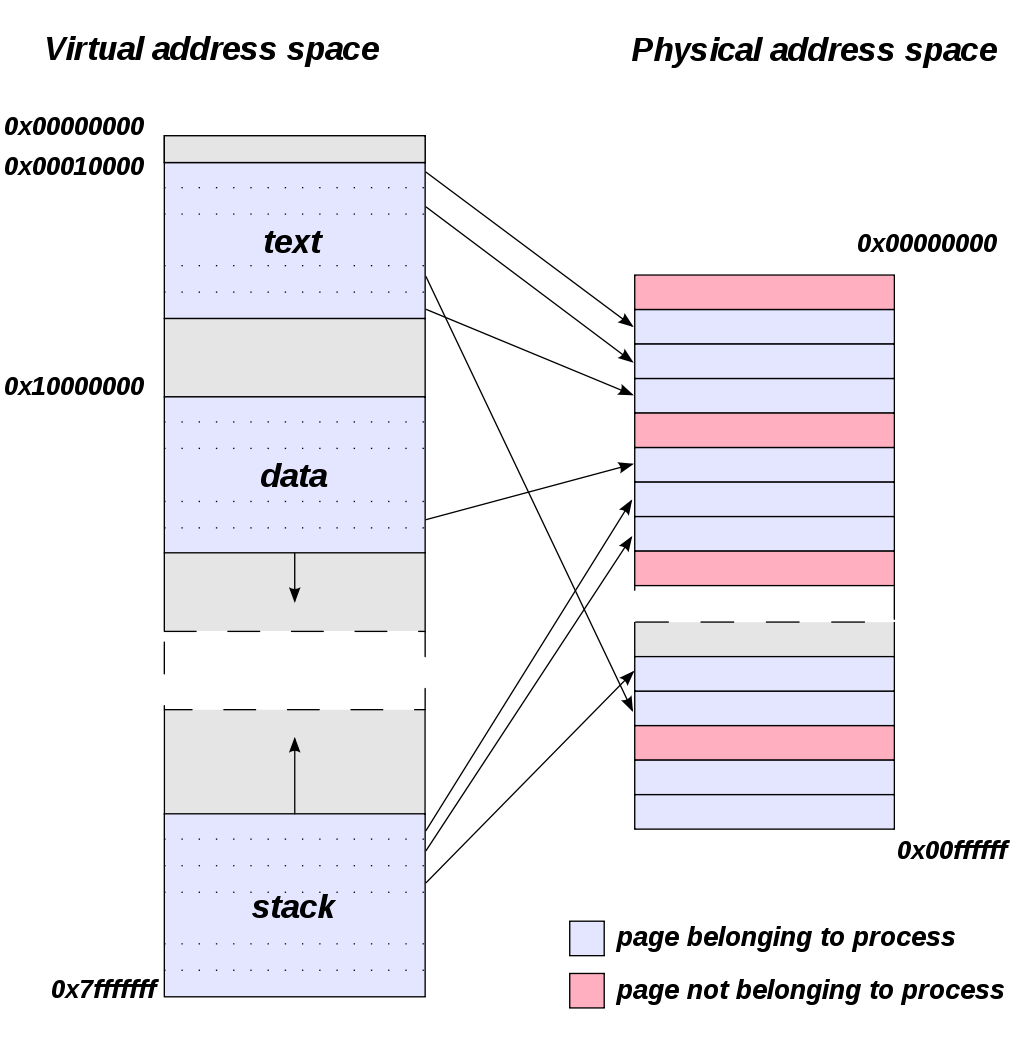
Although that diagram is not specific to VxWorks, it shows several features of address mapping which do apply to VxWorks 7:
- the numerical value of a virtual address may not match the numerical value of the physical address it’s mapped onto (that is, it’s not an “identity mapping”, or “one-to-one translation”)
- there may be regions of virtual address space that don’t map onto any physical addresses
- there may be regions of physical address space that aren’t mapped by any virtual adddresses
One of the key differences between VxWorks 6.9 and VxWorks 7 is that most virtual to physical address mapping is not “one-to-one”, so in general virtual addresses are numerically different to the physical addresses they map.
Virtual Memory Context
If you want to see the address mapping set up by the kernel, you can do so by calling the function vmContextShow from the kernel shell:
-> vmContextShow
VIRTUAL ADDR BLOCK LENGTH PHYSICAL ADDR PROT (S/U) CACHE SPECIAL
------------ ------------ ------------- ---------- -------- ------------
0x00000000 0x00050000 0x00000000 RW- / --- CB-/CO/- --/S3
0x00050000 0x00001000 0x00050000 R-X / --- CB-/CO/- --/S3
0x00051000 0x000af000 0x00051000 RW- / --- CB-/CO/- --/S3
0x00100000 0x00418000 0x00100000 R-X / --- CB-/CO/- --
...
0x00943000 0x00001000 0x00943000 R-- / --- CB-/CO/- --/S3
0x00944000 0x00cb9000 0x00944000 RW- / --- CB-/CO/- --/S3
0x20000000 0x00008000 0x015fd000 RW- / --- CB-/CO/- --/S3
0x20008000 0x00002000 0x01605000 RWX / --- CB-/CO/- --/S3
0x2000a000 0x0006f000 0x01607000 RW- / --- CB-/CO/- --/S3
0x20079000 0x00002000 0x01676000 RWX / --- OFF/CO/G --
0x2007b000 0x01f85000 0x01678000 RW- / --- CB-/CO/- --/S3
0x22000000 0x00004000 0xffd08000 RW- / --- OFF/CO/G --
0x22004000 0x00001000 0xffd05000 RW- / --- OFF/CO/G --
0x22005000 0x00001000 0xff708000 RW- / --- OFF/CO/G --
0x22006000 0x00002000 0xffc03000 RW- / --- OFF/CO/G --
0x22008000 0x00001000 0xffd05000 RW- / --- OFF/CO/G --
0x22009000 0x00001000 0xffd04000 RW- / --- OFF/CO/G --
0x2200a000 0x00002000 0xfffec000 RW- / --- OFF/CO/G --
0x2200c000 0x00001000 0xfffec000 RW- / --- OFF/CO/G --
0x2200d000 0x00001000 0xfffef000 RW- / --- OFF/CO/G --
0x2200e000 0x00002000 0xffc08000 RW- / --- OFF/CO/G --
...
0x22d32000 0x00002000 0x040c3000 RW- / --- CB-/CO/- --/S3
0x22d35000 0x00001000 0x040c6000 RW- / --- CB-/CO/- --/S3
0x22d37000 0x00002000 0x040c8000 RW- / --- CB-/CO/- --/S3
0x22d3a000 0x00001000 0x040cb000 RW- / --- CB-/CO/- --/S3
0x22d3c000 0x00002000 0x040cd000 RW- / --- CB-/CO/- --/S3
0x22d3f000 0x00f01000 0x040d0000 RW- / --- CB-/CO/- --/S3
value = 0 = 0x0
->
This function shows the whole virtual memory context and normally produces many lines of output, most of which I’ve clipped out of that excerpt. It only shows virtual address regions that are valid – that’s to say, mapped to physical addresses.
You can see that the output is sorted in order of increasing virtual address, and that the virtual address (0xffd02000) we tried to use in our register dump is not mapped to any physical address. That’s precisely why we got a data abort exception: that virtual address doesn’t access any hardware.
You can also see that there are some regions of physical address space close to the hardware we’re interested in that are mapped into the virtual address space. For example, virtual address 0x22008000 maps to physical address 0xffd05000 which happens to be the Cyclone V HPS Reset Manager.
If you’re wondering why some hardware devices are mapped into virtual address space but others aren’t, the short answer is that this is defined by the device tree which describes the hardware and specifies how it’s laid out in the physical address space. When VxWorks starts, it parses the device tree and finds drivers for the hardware devices. When these drivers are initialised they map the physical memory regions associated with their devices.
Manual mapping
It’s also possible to map a region of physical address space after the operating system has started up. There are several ways to do this but I find the most convenient is to use the function pmapGlobalMap which takes three arguments:
- the physical address of the region to be mapped;
- the length in bytes of the region to be mapped;
- the attributes with which the region should be mapped.
pmapGlobalMap returns a virtual address for the mapping.
Before going any further, here’s an example:
-> l4wd0 = pmapGlobalMap (0xffd02000ULL, 0x1000, 0x483)
New symbol "l4wd0" added to kernel symbol table.
l4wd0 = 0x22bea338: value = 579825664 = 0x228f7000
->
The physical address is what you’ll find in the hardware data sheet, and what you’d have used in VxWorks 6.9: for example, to access the Cyclone V HPS L4 watchdog timer it will be 0xffd02000.
Beware that VxWorks represents physical addresses using 64-bit quantities, so to make sure the shell passes a 64-bit value to pmapGlobalMap I’ve added the ULL suffix. You can sometimes get away without that, but adding it makes sure there won’t be any surprises.
The length will be whatever is needed to map the set of registers you’re interested in. (VxWorks will silently round up tje length so that the mapping is at least one virtual memory page, typically 4 KiB.)
The attributes will define what kind of accesses you can use through the virtual address. To access hardware registers you’ll typically need read and write access, but you’ll probably also need some extra attributes to make sure that your accesses bypass the cache.
I arrived at the value 0x483 for the attributes by finding the MMU_ATTR_* definitions in VxWorks vmLibCommon.h. Breaking it down: 0x3 gives read/write access, 0x80 makes the access non-cacheable, and 0x400 makes the access guarded to preserve access order (on ARM architecture).
In the example, I also stored the returned virtual address in a new variable l4wd0. This is not required, it just makes it more convenient when referring to the virtual address.
The end result
So, finally, we can dump the HPS L4 watchdog registers from the VxWorks 7 kernel shell:
-> d l4wd0, 32, 4
NOTE: memory values are displayed in hexadecimal.
0x228f7000: 00000001 000000ff 7b02c5be 00000000 *...........{....*
0x228f7010: 00000000 00000000 3130362a 00000000 *........*601....*
0x228f7020: 00000000 00000000 00000000 00000000 *................*
0x228f7030: 00000000 00000000 00000000 00000000 *................*
0x228f7040: 00000000 00000000 00000000 00000000 *................*
0x228f7050: 00000000 00000000 00000000 00000000 *................*
0x228f7060: 00000000 00000000 00000000 00000000 *................*
0x228f7070: 00000000 00000000 00000000 00000000 *................*
value = 0 = 0x0
->
You can also confirm that the mapping shows up in the output from vmContextShow:
-> vmContextShow
VIRTUAL ADDR BLOCK LENGTH PHYSICAL ADDR PROT (S/U) CACHE SPECIAL
------------ ------------ ------------- ---------- -------- ------------
0x00000000 0x00050000 0x00000000 RW- / --- CB-/CO/- --/S3
0x00050000 0x00001000 0x00050000 R-X / --- CB-/CO/- --/S3
0x00051000 0x000af000 0x00051000 RW- / --- CB-/CO/- --/S3
0x00100000 0x00418000 0x00100000 R-X / --- CB-/CO/- --
...
0x228f7000 0x00001000 0xffd02000 RW- / --- OFF/CO/G --
...
0x22d32000 0x00002000 0x040c3000 RW- / --- CB-/CO/- --/S3
0x22d35000 0x00001000 0x040c6000 RW- / --- CB-/CO/- --/S3
0x22d37000 0x00002000 0x040c8000 RW- / --- CB-/CO/- --/S3
0x22d3a000 0x00001000 0x040cb000 RW- / --- CB-/CO/- --/S3
0x22d3c000 0x00002000 0x040cd000 RW- / --- CB-/CO/- --/S3
0x22d3f000 0x00f01000 0x040d0000 RW- / --- CB-/CO/- --/S3
value = 0 = 0x0
->
Conclusion
Although that seemed like quite a long-winded process, in practice there are only two steps:
- map the hardware using
pmapGlobalMapto get a virtual address; - access it using the same methods as in VxWorks 6.9, but using the new virtual address.
I hope that’s been helpful. Please let me know if there are any other topics you’d like me to cover in a future blog post.

